BG (Blood Glucose) Monitoring
Tips, tricks, and best practices related to home testing.
Please see these related pages:
Home Blood Glucose Testing of the Diabetic Cat
If you have a diabetic cat, consider doing home blood glucose testing. After a few tests, the vast majority of cats won’t mind this at all. Advantages of home testing include less stress to your cat, considerably decreased costs and time of monitoring compared to vet visits, closer control of your cat’s blood glucose level and possible avoidance of deadly hypoglycemic episodes.
This technique and the results should be discussed with your vet before any changes in the amount of insulin you give your cat.
NOTE: There is some information on working with blood glucose (BG) curves in the “Diabetes for Beginners” section of this web site.
Informational Links, Instructions, & Pictures
Veterinary Partner
Dr. Lisa’s Hometesting Information
Pearl the Diabetic Cat Blog
The Illumavein device
Awesome Videos
Note: Your cat may not initially behave as these cats do, but it will certainly give you something to look forward to. Many cats end up this calm after only a week or two of testing. Frustration is normal, but you *can* do this!
Mark and Buddy on YouTube
Lynette tests Louie
Monty the Diabetic Cat on YouTube
Lynette Tests Dreamsicle
Jen tests Smokey
Heather uses Raja’s paw to get a blood sample: Video I
Heather uses Raja’s paw to get a blood sample: Video II
Tips and Tricks
Please read the walk throughs and instructional sites for more in depth help.
When you get a test reading of over 300 on a human meter, you will probably see KETONES? flash on the screen. This is a warning to human diabetics and does not indicate your cat has ketones. Most meters cannot test for ketones. One meter CAN test for ketones.. the Abbott Precision Xtra meter (known outside of the USA as brand name Precision/Optimum/Xceed).
Rice socks are commonly used to warm the ear. Rolled oats may also be used. Put a few tablespoons of rice or oats in a sock, knot it, and microwave it 20-30 seconds. Test on your wrist before applying to your cat’s ear. After a minute or two of the warm sock, the ear should be warm enough to prick.
Other methods of warming the ear include: warm wet washcloth in a ziplock bag; vigorous massage/rubbing; wrapping the ear around a pill bottle with warm water in it.
To hold or not to hold? Some cats prefer not to be held. You can use the “knee catch” where you back the cat between your knees while kneeling. You can place the cat between you and the sofa arm. You can wrap the kitty in a towel, like a kitty “burrito”. You can test the cat wherever you find her. You can have a testing table or counter, where you place kitty for every test. Or you can do what I do – Sit on the floor with kitty in your lap. All of my cats are tested this way, but it doesn’t mean it’s the only way. Try everything you can think of, request advice if you need it, and give treats and praise for every single behavior you want to reinforce. The more positive the experience, the more likely it is to be accepted.
Bribery is the best reward for testing. Most cats stop being annoyed with the tests in a very short amount of time if they are properly bribed. Some use cuddling and scritches as a reward, others use treats. Whatever you use, make sure kitty gets a reward for every test, even if it was a dismal failure.
Your mental state will be key to both successful tests and successful shots. Your cat can sense when you are nervous or upset and will respond accordingly, frequently trying to flee the scene. Feel positive that you will “get this thing done”, and that approach will go a long way towards soothing a stressed pet. Human frustration is easily sensed and disparaged by cats, so if you feel it coming on, take a break.
A dab of vasoline or neosporin with pain relief can help the blood pool rather than soaking into the fur, and helps to heal the ear after the prick.
Using a tissue, always apply pressure to both sides of the ear for 20-30 seconds or so to stop the bleeding (or blood under the skin) and prevent bruising.
A personal note: I have been testing cats now for a long time, both diabetic and non-diabetic. You will hear people, and maybe even your own vet, say cats hate it, or they will scar for life, or that this is a painful procedure. This is simply not true. None of us have terrorized cats with scarred ears – what we have are thriving cats with perfect ears who are alive because we hometest.
Watch these videos and see for yourself how quickly cats not only adapt, but thrive, with hometesting. These cats are not rare, or “the mellow kind”. They are normal cats, just like the one you own. Most cats come to look forward to testing time and the associated love, treats and healing. They are as smart as you think they are, and they will almost immediately associate that testing is part of why they feel better.
..Carolyn
Materials for home testing
- Glucometer
- If your instruction book confuses you, see if there is an 800 number to call so a company representative can guide you through the first-time setup and calibration.
- Test strips
- Lancets; a lancet pen probably came with your meter. You can use this pen or just hold the lancet for a “free hand” stick. Starting with the lancet pen is recommended.
- OPTIONAL:
- Warm washcloth or a rice-filled sock that has been heated in microwave for 15 seconds – CHECK THE TEMPERATURE ON YOUR WRIST
- Facial tissue or cotton ball to apply pressure to the puncture site after the test
- Small flashlight or Illumavein
Tips for Success
- Read your glucometer manual.
- Put all the materials on your right if you’re right handed or on your left if you’re left-handed.
- Begin by petting and stroking your cat, speaking in affectionate tones
- Do NOT clean the stick area with alcohol. If dirty, use water and then dry thoroughly.
- Use the cloth or sock to warm the ear or paw pad before pricking to increase blood flow and enlarge the capillaries and veins.
- Alternatively, gently massage the area with your fingertips.
If you use the lancet manually (not in a pen), prick at a 45 degree angle. - Praise your pet and consider giving a treat.
Method
- Assemble all your materials and wash your hands.
- Position your cat so both of you are comfortable.
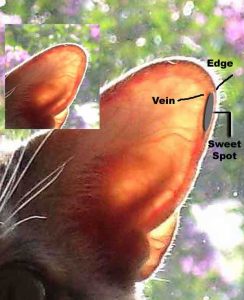
- Locate a vein on your cat’s ear by shining a flashlight behind it. The vein will look like a red string and should be near the edge of the ear. If you are using a paw pad, use the large pad.
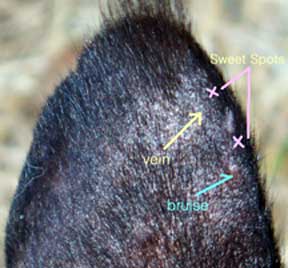
Photo courtesy of Pawprints and TEN
Laur and Danny’s Famous “The Sweet Spot”
- Use the cloth or sock to warm the ear or paw pad before pricking to increase blood flow and enlarge the capillaries and veins.
- Alternatively, gently massage the area with your fingertips.
Position the lancet and do the prick.
Touch the tip of the test strip to the top of the blood drop at a slight angle. - If necessary apply slight pressure to the prick site for a few seconds to stop the bleeding.
- Wait for the glucometer to give the final reading. Most glucometers will warn you if there is insufficient blood on the test strip.
- Record the date, time, and glucose reading in a notebook. Your meter will store a lot of data, but you should always back up your data manually or, if available with your meter, download the data to your computer periodically.
Ear Sticks
I. Contributed by Julie Paque
Supplies needed:
Blood glucose monitor that requires a small amount of blood. (I use the Precision Blood Glucose Monitor made by Medisense. It needs only 5 micro liters of blood, vs. up to 30 micro liters for other monitors. Their customer service at their 800 number is great, too.) These are available from your local pharmacy, and a rebate is also often available, bringing the price down considerably. The companies make their money with the test strips, not the meters.
Test strips for monitor (most come with a learning supply.) These run about $35-40 for a supply of 50 strips.
Microcapillaries, 75 mm long by 1 mm diameter. You can use heparinized or non-heparinized, it doesn’t matter, so go for what you can find or is cheaper. Your vet may be able to help you get some, or a medical or chemistry supply store. Use one per test.
A bulb with a hole for the end of the microcapillary (optional, to blow the blood out of the capillary onto the test strip.)
Tissue or gauze pads
Outline of procedure:
You will use the lancet included in the blood glucose monitor kit to prick the ear of your cat. The microcapillary will pick up the blood drop from the ear and you will put it on the test strip.
Detailed steps:
Learn how to use the meter, testing on yourself.
Getting blood from the cat:
a. Look carefully around the edge of the ear, you’ll see a vein running just inside the edge. You may need a flashlight to see the vein, shine the flashlight from under the ear and the vein is visible even on dark haired cats.
b. When learning it is best to test the cat when he’s warm. Such as when he’s been sitting in the sun, or curled up in a particularly warm spot. You’ll notice a big difference in the temperature of the ears, and it is much easier to get blood from warm ears than from cold ones! Later on when you have the technique down you’ll be able to do it even when they’re cold, but make it easy on yourself by optimizing conditions for you and the cat.
c. Have a folded tissue or gauze pad, the lancet, and the capillary ready. Put the cat between your knees, facing away from you. Keep your feet together so he can’t back out. Don’t wash the ear with water or alcohol before you prick it, you’ll never be able to collect the blood.
d. You’re going to use the lancet to prick the ear near the vein, if you hit the vein you’ll get plenty of blood, if you’re near it you’ll still be able to get enough. Put the tissue underneath the ear so you don’t prick yourself and contaminate the blood sample. You may need to prick more than once initially to get enough blood, gentle massage around the site will also encourage the blood to come out. After you’ve done a series of tests in the same area it becomes slightly swollen and it is easier to get the blood on one prick.
e. Pick up the blood with the capillary. For the Precision monitor I need a little more than 5 mm of blood in the capillary in order to perform the test. It just so happens that the capillaries that I am using have a line at the 5 mm mark. Set the capillary with the blood aside and use the tissue to apply pressure to stop any bleeding on the cat’s ear. Give him a big hug for cooperating and let him free.
f. Put the test strip in the monitor and wait for the ready signal. Put the blood on the strip. If you have a bulb for the end of the capillary cover the hole and squeeze to get the blood out of the capillary. If you don’t have one you can blow through the opposite end. Record the results in the booklet.
If the results of any test seem unusual it is always a good idea to repeat the test. Don’t ever make radical changes in what you’re doing based on a single results. And it’s always a good idea to keep your vet up to date on the results of your testing and work with him or her to determine any changes necessary to your cat’s regimen.
II. Contributed by Darlene
I have a Glucometer Elite, and love it. All you need is a drop of blood the size of an “o” in newspaper print. No separate capillary tubes — it’s built right into the test strip. I do ear sticks when I test, which isn’t often these days because Pooter is doing so well. Before he was regulated, I did my own curves and plotted them for the vet to look at rather than taking the cat in for a whole day, and spot-checked once in a while when he wasn’t acting right.
The chemical reaction in the test strip is very sensitive to humidity and anything else that can get into that little slot, so you have to be both careful and quick. Once you put the test strip into the machine, you only have three minutes to get the sample, which may not be enough while you’re still learning how to keep the cat from flicking his ear and sending the blood drop off into space.
Here’s my sequence. First I open an alcohol swab and twirl the lancet in it a few times to clean it off, then I open the foil test strip packet and put the strip into the meter just far enough to sit there but not far enough to activate it. Then I use the swab to sterilize the closed end of the packet and a patch of table for the cleaned packet to rest on.
Then I snuggle the cat and massage his ear until its good and warm (bleeds easier then … some people bring a lamp down close to warm up the ear). Then I stick him, and if he doesn’t bleed right away I massage the ear from the base up towards the pinhole and that sometimes brings up a small drop, otherwise he gets stuck again. Now you have to be quick, because that tiny drop congeals fast.
I scoop the drop up onto the sterilized end of the foil packet and release the cat — takes both hands to slip the open end of the packet back over the test strip to protect it from contamination while you push it the rest of the way into the meter (without losing the drop of blood on the other end). In a couple of seconds the meter says it’s ready, and you just touch the droplet to the end of the test strip until it’s sucked up and you hear the beep.
If your cat is more cooperative than Pooter, you’ll find that in no time you can warm the cat’s ear up first, then start the meter, do the stick, and take the sample right off the cat’s ear. More often than not, the irritation of the poke and the blood sitting there will bring on twitches, so I had to find a way of getting the sample onto a sterile surface before he bled all over the kitchen.
Oh — I was told not to use alcohol or anything to clean the cat’s ear for this, since it just inhibits bleeding and might contaminate the sample. The bleeding stops in seconds, and he’s had no infection or irritation despite the kazillion times I poked him in same spots. I do re-use the lancets, and clean them with alcohol before and after each use. I tried using the spring-loaded pen that jabs the lancet quickly, but the noise made him jump, so now I just hold the lancet itself. It’s easier to aim right at the little vein if you can see the sharp tip and exactly where it’s going, too.
The glucometer is a great idea, and Pooter wasn’t even close to regulated until I curved him with it several times. You’ll know exactly what’s going on with his blood sugars at the exact time you need to know — this means you can tell when his insulin peaks, how far down it’s taking the BG and for how long, and adjust his feeding (quantity and quality) to perfectly cover the insulin. Urine testing never gives you this precision — it only tells you that at some point over the last X hours, the BG did or didn’t get high enough to cause glucose dumping (and if it did, you don’t know when or for how long — all you know is that the BG was high enough for dumping to occur, which is the same level at which organic damage is being done). The meter will pay for itself in reduced vet visits, too. The main benefit for Pooter is that with close monitoring, a lot of the damage done to his body by poorly controlled diabetes is reversing — his legs are stronger, his kidneys are concentrating urine instead of washing out glucose, etc. etc.
The main benefit for me is is that I got my life back — I can inject him, feed him, and take off for the day without worrying whether he died in agony while I was out. For several months I absolutely had to be there when the insulin peaked, because he had so many reactions, or over-feed him to make sure there wasn’t one, so he got fatter and fatter and sicker and sicker. We’re both much happier now!
Darlene
III. Contributed by Kathy
Procedure for Home Testing of Blood Glucose using a Glucometer Elite Meter and a Lancet Device: Ear Sticks or Paw Sticks
. The “Follow-up” section of this monograph has an excellent description of using a spreadsheet to track your cat’s progress.
IV. Contributed by Donna B.
A nice comprehensive write-up of this caretaker’s approach to glucose monitoring.
V. Contributed by Eileen Swords RN, BA, BSN
I recommend the Fast Take monitor & the Soft Touch automatic lancet. (I am an NICU RN with 20 years of experience).
It is a very good idea to do all glucose testing in a “procedure room” in the house (in our case, it’s our spare bedroom & we now call it the “torture room”). The rationale for this is that the cat will be able to truly relax in the “safe” areas of the house. We use this technique in the hospital with our Peds patients so that they feel more relaxed in their hospital room. Our kitty gives us a very pained look when he is taken in “the room”, but he is VERY HAPPY when he is ANYWHERE else. We have not done this with the Insulin injections because he really does not seem to mind them.
Footpad Sticks
I. Contributed by Jerry
I just wanted to add my endorsement of the Glucometer Elite brand for home glucose testing. I tried another (cheaper) brand but was not able to obtain a large enough drop of blood for a reliable test. Glucometer Elite requires about one-fifth as much blood, making sampling much less traumatic on cat and owner.
I don’t use the lancing device supplied with the Elite. Rather, I use a standard pen-shaped lancing device. I use the head attachment intended in humans for thick, calloused skin – for a bit deeper puncture. Press this FIRMLY into the big pad on kitty’s rear foot. My cat had not cried nor flinched with this method. Finally, transferring the tiny drop of blood to the strip is easy; the strip itself wicks the sample into a little chamber. There is no continued bleeding, by the way. ***layman’s experience only – your results may vary*** – I offer this as an alternative to using the marginal ear vein.
Best of luck to all, Jerry
II. Contributed by Kathy
You may need to stick with the lancet manually or use a lancet device that gives deeper penetration (e.g., SoftClix with adjustable depth) and larger lancets to get enough blood. Otherwise it shows real promise as an alternate site to give the ears a break. Our cat doesn’t even move, like she doesn’t even feel the stick.
First wipe off the large pad on one of the paws with warm water and dry it. Press the lancet device FIRMLY against the pad and release the lancet. Then squeeze the pad to get a blood drop. Continue as described with ear sticks.
Last updated Feb 2012